MAIL 025 - DIY Vintage Inspired Vellum Envelope + Free Printable Envelope Templates

Hello everyone!
As you can see from the title & the photo above, I have gifts today!
Gotta love free printables!


I made a simple vellum envelope.
I always love making these envelopes. I love how they are see-through,
but not completely see-through. It adds a bit of elegance to the mail.
It can lend to a vintage look, which is what I went toward.


I stamped the front & added washi tapes.
I've really been into "stacking" my washi tapes lately.
I just stick them down right next to each other.
Perfect for backgrounds too!
The paper I used is artist's tracing paper. It is quite thick, so perfect for the mail.
My only note on this is, test your inks. Not all my inks do well on this paper.
They won't dry or they smear. So always check!
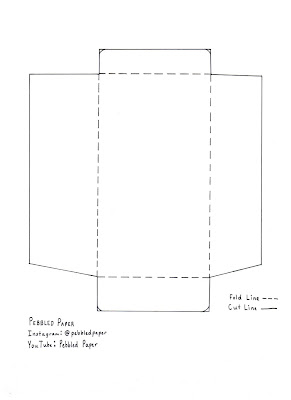
Of course, you don't have to use this template for vellum envelopes,
you can use it on any paper you would like. All you have to do is
cut it out & trace around the template onto your paper of choice!
I do have something I want to say about these templates.
One, I drew them myself, by hand, with a pen & ruler. So they are not perfect.
Second, they are slightly different from the envelopes I used because I had
already sent these after I decided to make templates. And I made some minor
improvements as well. The envelopes I originally used were kinda free handed.
You can watch me decorate, as well as make them in the video at the end of this post!
Both of the templates in this post have the option for rounded or pointed corners.
So your pick!
Here is the template for the vellum envelope!


I made a bunch of envelopes in a similar style to the gold colored one for friend.
She had a special event, so I made a bunch for her to take with her.
I decorated it very simply & put the stamped papers inside.
Like I said in my video, I wasn't sure what to send this Pen Pal.
So I kept it simple.
I used scrapbook paper to make the envelope.
These style of envelopes are generally call "seed packet style" envelopes.
So that is what I will call it.
As with the last envelope, you can choose rounded or pointed corners.
If you need help folding it, you can check out my video below.
It is optional whether you would like the bottom flap visible or not.
This envelope has less of an overlap on the back, so you may not be able to glue it.
I used washi tape for the overlap in the back on mine.
It adds a nice decorative touch too!
Of course, if you guys need any help, let me know in the comments!
I may make a post or video of how to fold them if needed.
So don't forget to check out my video below!
Subscribe for more videos!
Comments
Post a Comment